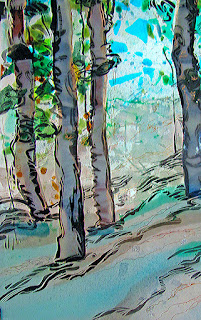
She said she planned to "use some outlines on the glass in order to create depth".
It is really important to realise that in a pictorial scene, LINES will always attract attention, and often pull things forwards. In a sense, they CAN help to give the impression of more depth as a result, by drawing attention to the foreground for instance, but lines need to be used judiciously. For example, if you place a line up against a tree which is further back in the scene, it will bring it forwards. Same applies if you put an outline edge on a distant hill. It will suddenly stop looking distant!
So...how to know quite what to do? Do it wrong on your glass piece and your heart will sink when you open the kiln.
My recommendation would be to take a photo of your glass piece just before you plan to use any lines. Print off the image. Maybe even print off several copies. Then, draw the lines onto the print, to try out their placement. Hold up the picture, ideally from a little distance, and see how it is working visually.
If you are computer savvy, you can also draw lines in a programme like photoshop, so you can produce an image, put it into Photoshop on your computer, and then play with the line work, adding and subtracting the lines very easily by using the "edit/undo" feature. In this way, by testing away from the glass, you will gain more information and more confidence about adding lines or outlines, for emphasis/drama/depth/fun or any other reason.
A few examples to demonstrate the point. In the impressionistic image I created, the "bluebell wood" at the top of this post, I use some gold linear work, carefully, just to give a sense of life and light to the scene, placing the lines to one side of tree trunks, as if they were catching touches of sunlight. This had the effect of bringing attention, and light, to just a few of the trunks and branches. The gold lines pulled forwards in the scene.
Alice Benvie Gebhardt uses line work extensively in her glass pieces. This one below demonstrates how an image can benefit from a few thoughtfully placed lines. We fully understand the slope of the land because of the lines used to describe it. Then, the lines on the trees not only provide a little definition, and hint at bark texture, they also bring those trees visually "forwards" in the scene and they echo the linear work on the ground, so that the trees, and the ground are visually connected...all singing from the same song sheet! Echoes work really well, pictorially. (bonus learning here).
In this next image, see how she has used a silver or white line on those dark right hand trees. Imagine it without the line...the dark trunks would melt into the foliage around them. And notice that she has not used the lighter lines on any of the distant trees, because I believe she knew this would be a mistake, as it would bring them forward and I am sure she wanted them to sit back in the scene.
ps how to draw lines on glass? Use an enamel "pen", or a Kemper Pen with enamel lustres, or a fine paintbrush with enamel, or any other clever idea for putting something liquid onto the surface.
Finally, let's look at what happens when I ADD lines to an image in Photoshop. The photo is untouched, then I added black linear work to a tree in the MIDDLE DISTANCE, but actually, it has the effect of drawing the attention straight to that tree. It certainly does not help to push it back in space, that is for sure. I hope you can see this.


No comments:
Post a Comment
please feel free to leave me a message